目录
- 1.props
- 2..sync
- 3.v-model
- 4.ref
- 5.$emit/v-on
- 6.$attrs/$listeners
- 7.$children/$parent
- 8.provide/inject
- 9.EventBus
- 10.Vuex
- 11.$root
- 12.slot
下面把每一种组件通信方式的写法一一列出
1. props
父组件向子组件传送数据,这应该是最常用的方式了
子组件接收到数据之后,不能直接修改父组件的数据。会报错,所以当父组件重新渲染时,数据会被覆盖。如果子组件内要修改的话推荐使用 computed
// Parent.vue 传送
<template>
    <child :msg="msg"></child>
</template>

// Child.vue 接收
export default {
  // 写法一 用数组接收
  props:['msg'],
  // 写法二 用对象接收,可以限定接收的数据类型、设置默认值、验证等
  props:{
      msg:{
          type:String,
          default:'这是默认数据'
      }
  },
  mounted(){
      console.log(this.msg)
  },
}
2. .sync
可以帮我们实现父组件向子组件传递的数据 的双向绑定,所以子组件接收到数据后可以直接修改,并且会同时修改父组件的数据
// Parent.vue
<template>
    <child :page.sync="page"></child>
</template>
<script>
export default {
    data(){
        return {
            page:1
        }
    }
}

// Child.vue
export default {
    props:["page"],
    computed(){
        // 当我们在子组件里修改 currentPage 时,父组件的 page 也会随之改变
        currentPage {
            get(){
                return this.page
            },
            set(newVal){
                this.$emit("update:page", newVal)
            }
        }
    }
}
</script>
3. v-model
和 .sync 类似,可以实现将父组件传给子组件的数据为双向绑定,子组件通过 $emit 修改父组件的数据
// Parent.vue
<template>
    <child v-model="value"></child>
</template>
<script>
export default {
    data(){
        return {
            value:1
        }
    }
}

// Child.vue
<template>
    <input :value="value" @input="handlerChange">
</template>
export default {
    props:["value"],
    // 可以修改事件名,默认为 input
    model:{
        event:"updateValue"
    },
    methods:{
        handlerChange(e){
            this.$emit("input", e.target.value)
            // 如果有上面的重命名就是这样
            this.$emit("updateValue", e.target.value)
        }
    }
}
</script>
4. ref
ref 如果在普通的DOM元素上,引用指向的就是该DOM元素;
如果在子组件上,引用的指向就是子组件实例,然后父组件就可以通过 ref 主动获取子组件的属性或者调用子组件的方法
// Child.vue
export default {
    data(){
        return {
            name:"沐华"
        }
    },
    methods:{
        someMethod(msg){
            console.log(msg)
        }
    }
}

// Parent.vue
<template>
    <child ref="child"></child>
</template>
<script>
export default {
    mounted(){
        const child = this.$refs.child
        console.log(child.name) // 沐华
        child.someMethod("调用了子组件的方法")
    }
}
</script>
5. $emit / v-on
子组件通过派发事件的方式给父组件数据,或者触发父组件更新等操作
// Child.vue 派发
export default {
  data(){
      return { msg: "这是发给父组件的信息" }
  },
  methods: {
      handleClick(){
          this.$emit("sendMsg",this.msg)
      }
  },
}
// Parent.vue 响应
<template>
    <child v-on:sendMsg="getChildMsg"></child>
    // 或 简写
    <child @sendMsg="getChildMsg"></child>
</template>

export default {
    methods:{
        getChildMsg(msg){
            console.log(msg) // 这是父组件接收到的消息
        }
    }
}
6. $attrs / $listeners
多层嵌套组件传递数据时,如果只是传递数据,而不做中间处理的话就可以用这个,比如父组件向孙子组件传递数据时
$attrs:包含父作用域里除 class 和 style 除外的非 props 属性集合。通过 this.$attrs 获取父作用域中所有符合条件的属性集合,然后还要继续传给子组件内部的其他组件,就可以通过 v-bind="$attrs"
$listeners:包含父作用域里 .native 除外的监听事件集合。如果还要继续传给子组件内部的其他组件,就可以通过 v-on="$linteners"
使用方式是相同的
// Parent.vue
<template>
    <child :name="name" title="1111" ></child>
</template
export default{
    data(){
        return {
            name:"沐华"
        }
    }
}

// Child.vue
<template>
    // 继续传给孙子组件
    <sun-child v-bind="$attrs"></sun-child>
</template>
export default{
    props:["name"], // 这里可以接收,也可以不接收
    mounted(){
        // 如果props接收了name 就是 { title:1111 },否则就是{ name:"沐华", title:1111 }
        console.log(this.$attrs)
    }
}
7. $children / $parent
$children:获取到一个包含所有子组件(不包含孙子组件)的 VueComponent 对象数组,可以直接拿到子组件中所有数据和方法等
$parent:获取到一个父节点的 VueComponent 对象,同样包含父节点中所有数据和方法等
// Parent.vue
export default{
    mounted(){
        this.$children[0].someMethod() // 调用第一个子组件的方法
        this.$children[0].name // 获取第一个子组件中的属性
    }
}

// Child.vue
export default{
    mounted(){
        this.$parent.someMethod() // 调用父组件的方法
        this.$parent.name // 获取父组件中的属性
    }
}
8. provide / inject
provide / inject 为依赖注入,说是不推荐直接用于应用程序代码中,但是在一些插件或组件库里却是被常用,所以我觉得用也没啥,还挺好用的
provide:可以让我们指定想要提供给后代组件的数据或方法
inject:在任何后代组件中接收想要添加在这个组件上的数据或方法,不管组件嵌套多深都可以直接拿来用
要注意的是 provide 和 inject 传递的数据不是响应式的,也就是说用 inject 接收来数据后,provide 里的数据改变了,后代组件中的数据不会改变,除非传入的就是一个可监听的对象
所以建议还是传递一些常量或者方法
// 父组件
export default{
    // 方法一 不能获取 methods 中的方法
    provide:{
        name:"沐华",
        age: this.data中的属性
    },
    // 方法二 不能获取 data 中的属性
    provide(){
        return {
            name:"沐华",
            someMethod:this.someMethod // methods 中的方法
        }
    },
    methods:{
        someMethod(){
            console.log("这是注入的方法")
        }
    }
}

// 后代组件
export default{
    inject:["name","someMethod"],
    mounted(){
        console.log(this.name)
        this.someMethod()
    }
}
9. EventBus
EventBus 是中央事件总线,不管是父子组件,兄弟组件,跨层级组件等都可以使用它完成通信操作
定义方式有三种
/方法一:
// 抽离成一个单独的 js 文件 Bus.js ,然后在需要的地方引入
// Bus.js
import Vue from "vue"
export default new Vue()
方法二 :直接挂载到全局
// main.js
import Vue from "vue"
Vue.prototype.$bus = new Vue()
方法三 :注入到 Vue 根对象上
// main.js
import Vue from "vue"
new Vue({
    el:"#app",
    data:{
        Bus: new Vue()
    }
})
使用如下,以方法一按需引入为例
// 在需要向外部发送自定义事件的组件内
<template>
    <button @click="handlerClick">按钮</button>
</template>
import Bus from "./Bus.js"
export default{
    methods:{
        handlerClick(){
            // 自定义事件名 sendMsg
            Bus.$emit("sendMsg", "这是要向外部发送的数据")
        }
    }
}

// 在需要接收外部事件的组件内
import Bus from "./Bus.js"
export default{
    mounted(){
        // 监听事件的触发
        Bus.$on("sendMsg", data => {
            console.log("这是接收到的数据:", data)
        })
    },
    beforeDestroy(){
        // 取消监听
        Bus.$off("sendMsg")
    }
}
10. Vuex
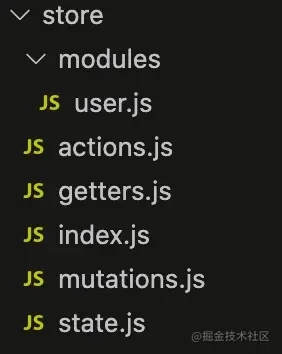
Vuex 是状态管理器,集中式存储管理所有组件的状态。这一块内容过长,如果基础不熟的话可以看这个Vuex,然后大致用法如下
比如创建这样的文件结构

index.js 里内容如下:
import Vue from 'vue'
import Vuex from 'vuex'
import getters from './getters'
import actions from './actions'
import mutations from './mutations'
import state from './state'
import user from './modules/user'

Vue.use(Vuex)

const store = new Vuex.Store({
  modules: {
    user
  },
  getters,
  actions,
  mutations,
  state
})
export default store
然后在 main.js 引入:
import Vue from "vue"
import store from "./store"
new Vue({
    el:"#app",
    store,
    render: h => h(App)
})
然后在需要的使用组件里:
import { mapGetters, mapMutations } from "vuex"
export default{
    computed:{
        // 方式一 然后通过 this.属性名就可以用了
        ...mapGetters(["引入getters.js里属性1","属性2"])
        // 方式二
        ...mapGetters("user", ["user模块里的属性1","属性2"])
    },
    methods:{
        // 方式一 然后通过 this.属性名就可以用了
        ...mapMutations(["引入mutations.js里的方法1","方法2"])
        // 方式二
        ...mapMutations("user",["引入user模块里的方法1","方法2"])
    }
}

// 或者也可以这样获取
this.$store.state.xxx
this.$store.state.user.xxx
11. $root
$root 可以拿到 App.vue 里的数据和方法
12. slot
就是把子组件的数据通过插槽的方式传给父组件使用,然后再插回来
// Child.vue
<template>
    <div>
        <slot :user="user"></slot>
    </div>
</template>
export default{
    data(){
        return {
            user:{ name:"沐华" }
        }
    }
}

// Parent.vue
<template>
    <div>
        <child v-slot="slotProps">
            {{ slotProps.user.name }}
        </child>
    </div>
</template>
到此这篇关于Vue2.x 的12种组件通信的文章就介绍到这了,更多相关Vue2.x 组件通信内容请搜索NICE源码以前的文章或继续浏览下面的相关文章希望大家以后多多支持NICE源码!


