目录
- 一、简介
- 二、优点
- 三、使用步骤
- 1.安装Vuex
- 2.引用Vuex
- 3.创建仓库Store
- 四、包含模块
- 1.State
- 2.Getters
- 3.Mutations
- 4.Action
- 5.Modules
- 五、Vuex最最简单的项目实例
- 1.存储数据
- 2.获取数据
- 3.store文件目录结构
- index.js
- state.js
- mutations.js
- actions.js
- getters.js
- 4.使用store

一、简介
我们来看看对 Vuex 比较专业的介绍:
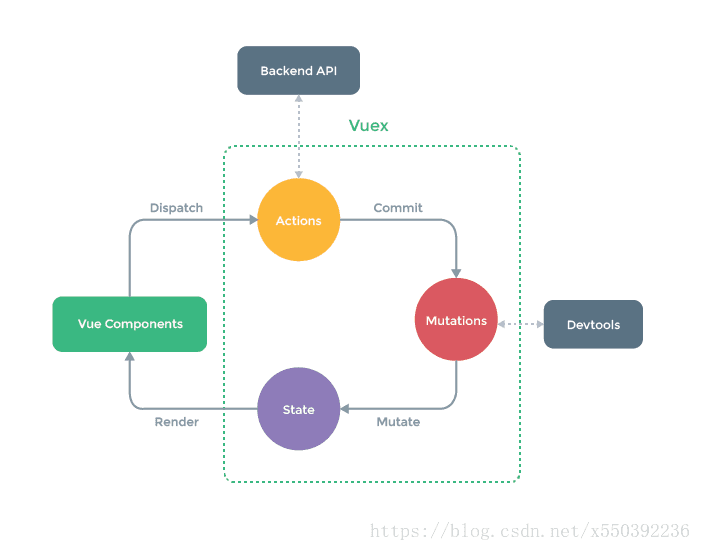
Vuex 是一个专为 Vue 开发的应用程序的状态管理模式,它采用集中式存储管理应用的所有组件的状态,并以相应的规则保证状态以一种可预测的方式发生变化。
简而言之,Vuex 采用类似全局对象的形式来管理所有组件的公用数据,如果想修改这个全局对象的数据,得按照Vuex提供的方式来修改(不能自己随意用自己的方式来修改)。
二、优点
Vuex状态管理跟使用传统全局变量的不同之处:
- Vuex的状态存储是响应式的: 就是当你的组件使用到了这个 Vuex 的状态,一旦它改变了,所有关联的组件都会自动更新相对应的数据,这样开发者省事很多。
- 不能直接修改Vuex的状态: 如果是个全局对象变量,要修改很容易,但是在 Vuex 中不能这样做,想修改就得使用 Vuex 提供的唯一途径:显示地提交(
commint)mutations来实现修改。这样做的好处就是方便我们跟踪每一个状态的变化,在开发过程中调试的时候,非常实用。
三、使用步骤
1. 安装Vuex
npm install vuex --save
2. 引用Vuex
import Vue from 'vue'
import Vuex from 'vuex'
Vue.use(Vuex)
3. 创建仓库Store
要使用 Vuex,我们要创建一个实例 store,我们称之为仓库,利用这个仓库 store 来对我们的状态进行管理。
//创建一个 store
const store = new Vuex.Store({});
四、包含模块
- State:定义了应用状态的数据结构,可以在这里设置默认的初始状态。
- Getter:允许组件从 store 中获取数据,
mapGetters辅助函数仅仅是将 store 中的getter映射到局部计算属性。 - Mutation:是唯一更改 store 中状态的方法,且必须是同步函数。
- Action:用于提交
mutation,而不是直接变更状态,可以包含任意异步操作。 - Module:可以将 store 分割成模块(module)。每个模块拥有自己的
state、mutation、action、getter、甚至是嵌套子模块
Vuex的作用类似全局对象,Vuex 使用单一状态树,用一个对象State包含了整个应用层级的所有状态,你可以理解为这些状态就是一堆全局变量和数据。

1. State
假设我们有一个全局状态 count 的值为 5。那么,我们就可以将其定义为 state 对象中的 key 和 value,作为全局状态供我们使用。如下:
 //创建一个 store
 const store = new Vuex.Store({
    //state存储应用层的状态
    state:{
        count:5  //总数:5
    }
 });
2. Getters
可以认为,getters 是store的计算属性,类似于computed,对state里的数据进行一些过滤,改造等等
假设我们要在state.count的基础上派生出一个新的状态newCount出来,就适合使用我们的 getters
getters 接受 state 作为其第一个参数
const store = new Vuex.Store({
   //state存储应用层的状态
   state:{
      count:5  //总数:5
   },
   getters:{
      newCount:state => state.count * 3
   }
});
在组件中获取 { {newCount}} 方式:
export default {
  computed: {
      newCount(){
          return this.$store.getters.newCount;
      }
  }
};
3. Mutations
Vuex 给我们提供修改仓库 store中的状态的唯一办法就是通过提交mutation ,且必须是同步函数
我们在 mutations中定义了一个叫increment的函数,函数体就是我们要进行更改的地方
会接受 state作为第一个参数,第二个是自定义传参
 const store = new Vuex.Store({
    //state存储应用层的状态
    state:{
        count:5  //总数:5
    },
    // mutations是修改state中数据的唯一途径
    mutations:{
        increment(state,value){
            state.count += value;
        }
    }
 });
我们在提交commit时候,第一个参数"increment",就是对应在 mutations中的increment方法,第二个参数是自定义值。例如:
 methods: {
   getVal(event) {
     //获取当前的按键的值
     let value = event.target.dataset.value;
     //通过commit提交一个名为increment的mutation
     this.$store.commit("increment", value);
   }
 }
在组件中获取 { {count}} 方式:
export default {
  computed: {
      count(){
          return this.$store.state.count;
      }
  }
};
4. Action
- 用于提交
mutation,而不是直接变更状态,可以包含任意异步操作 - 只有通过
action=>mutations=>states,这个流程进行操作,具体步骤如下:
export default new Vuex.Store({
    //存放数据
    state: {
        obj: {},
    },
    //4. 通过commit mutations中的方法来处理
    mutations: {
        getParam(state, Object) {
            //5.修改state中的数据
            state.obj = Object
        }
    },
    //2.接受dispatch传递过来的方法和参数
    actions: {
        getParamSync(store, Object) {
            // 处理异步操作
            setTimeout(() => {
                //3.通过commit提交一个名为getParam的mutation
                //action 函数接收一个 store 的实例对象,因此你可以调用 store.commit 提交一个 mutation
                store.commit('getParam', Object);
            }, 1000)
        }
    }
})
然后我们就在组件里这么调用就可以了
methods: {
   getVal() {
	  let name= 'xia';
	  let age= '26';
	  let sex= 'man';
	  //1.通过dispatch将方法getParamSync和多个参数{name,age,sex}传递给actions
	  this.$store.dispatch('getParamSync',{name,age,sex})
   }
}
5. Modules
随着项目的复杂度增大,为了方便管理 Vuex,一般会将其按功能分割成不同的模块(Module),方便日后管理。每个模块拥有自己的 state、mutation、action、getter 甚至是嵌套子模块
import Vue from 'vue'
import Vuex from 'vuex'
import state from './state'
import mutations from './mutations'
import actions from './actions'
import * as getters from './getters'

import moduleA from './module/moduleA' // 模块A
import moduleB from './module/moduleB' // 模块B

Vue.use(Vuex)

export default new Vuex.Store({
    actions,
    getters,
    state,
    mutations,
    modules: {
        moduleA,
        moduleB
    }
})
moduleA.js / moduleB.js 文件
// 每个模块拥有自己的 state、mutation、action、getter、甚至是嵌套子模块
export default {
    state: {
        text: 'moduleA'
    },
    getters: {},
    mutations: {},
    actions: {}
}
然后我们就在组件里这么调用就可以了
<template>
	<div class="demo">
		<h1>{{getText1}}</h1>
		<h1>{{getText2}}</h1>
	</div>
</template>
computed: {
    getText1(){
    	return this.$store.state.moduleA.text;
    },
    //或
	...mapState({
		getText2: state => state.moduleB.text;
	})
}
由此可知,模块内部的 state 是局部的,只属于模块本身所有,所以外部必须通过对应的模块名进行访问。
五、Vuex最最简单的项目实例
运用vuex语法糖mapMutations和mapGetters
1. 存储数据
a.vue 文件
import { mapMutations } from "vuex"; // 引入mapMutations
export default {
	methods: {
		...mapMutations({
		    // 将changeNews与mutations中的SET_NEWS关联
		    changeNews: "SET_NEWS"
		}),
		submit(){
			// 提交一个名为changeNews的mutation,并传入参数val
			let val = 'test news';
			this.changeNews(val);// 相当于this.$store.commit("changeNews", val);
		}
	}
}
2. 获取数据
b.vue 文件
import { mapGetters } from "vuex"; // 引入mapGetters
export default {
	computed: {
        // 用vuex读取数据(读取的是getters.js中的数据)
        // 相当于this.$store.getters.news(vuex语法糖)
        ...mapGetters(["news"])
	},
	created() {
        // 获取getters中news数据
        console.log(this.news);
	}
}
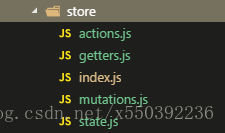
3. store文件目录结构

index.js
import Vue from 'vue'
import Vuex from 'vuex'
import state from './state'
import mutations from './mutations'
import actions from './actions'
import * as getters from './getters'

//每次修改state都会在控制台打印log
import createLogger from 'vuex/dist/logger'

Vue.use(Vuex)

const debug = process.env.NODE_ENV !== 'production'

export default new Vuex.Store({
	actions,
	getters,
	state,
	mutations,
	strict: debug, // 当debug=true时开启严格模式(性能有损耗)
	plugins: debug ? [createLogger()] : []
})
state.js
const state = {
	news: {}
}

export default state;
mutations.js
const mutations = {
	SET_NEWS(state, val) {
		state.news= val
	}
}

export default mutations;
actions.js
//异步处理
const actions = {
    M_NEWS({ commit }, val) {
        commit('SET_NEWS', val);  // commit mutations修改
    }
}

export default actions;
getters.js
// 通常通过getters取数据 (this.$store.getters.news;)
export const news = state => state.news  // 不做其他处理 直接映射出去
4. 使用store
在 main.js 中引用
import store from './store' //vuex存储文件

new Vue({
	el: '#app',
	router,
	store,
	components: {
		App
	},
	template: '<App/>'
})
到此这篇关于Vuex总体案例详解的文章就介绍到这了,更多相关Vuex总体内容请搜索NICE源码以前的文章或继续浏览下面的相关文章希望大家以后多多支持NICE源码!


