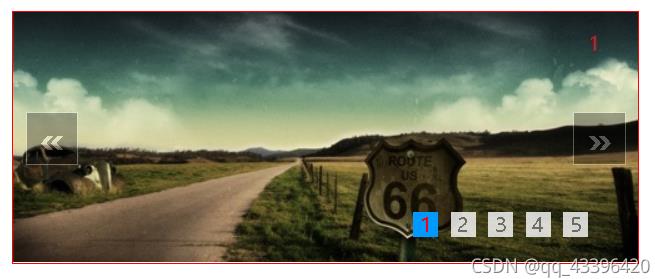
本文实例为大家分享了js实现简单轮播图效果的具体代码,供大家参考,具体内容如下
效果如下:

分析:
分析效果:


分析实现:
1、通过 document.querySelector(‘.类名’) 的形式获取到装轮播图的大盒子(.carousel)、装轮播图左右按钮的标签的父元素(.chevron)、获取左右按钮(.chevron-left 、.chevron-right)、获取放轮播图图片的父元素ul(.carousel-body)【注:这里获取ul而不是回去li,是因为移动轮播图的时候是整个ul一起移动的】、最后还要获取装轮播图图片的li(.indicators li)
//装轮播图的大盒子
let oCarousel = document.querySelector('.carousel')
//装轮播图左右按钮的标签的父元素
let oChevron = document.querySelector('.chevron')
//左按钮
let oLeft = document.querySelector('.chevron-left')
//右按钮
let oRight = document.querySelector('.chevron-right')
//获取放轮播图图片的父元素ul
let oUl = document.querySelector('.carousel-body')
//获取装轮播图图片的li
let oActives = document.querySelectorAll('.indicators li')
2、实现通过点击左右按钮使轮播图实现上一张、下一张的效果:
先封装一个animation()函数,便于多次调用
function animation(obj,target){
    // 清除定时器
        clearInterval(obj.timer)
        obj.timer=setInterval(()=>{
            // 读取元素当前位置
            let curX=obj.offsetLeft

            //定义一个步长
            let step=10
            // 判断将要移动的方向(比较目标位置与当前位置的大小)
            if(target<curX){
                step=-10
            }
            // 根据当前位置与目标位置,以及步长的关系判断
            // 只要目标位置与当前位置之间的距离 < 步长,就直接将元素的位置设置为目标为位置即可
            if(Math.abs(target-curX)<Math.abs(step)){
                obj.style.left=target+'px'
                clearInterval(obj.timer)
            }else{
                // 计算下一步的位置
                let nextX=curX+step
                // 将下一步的位置赋值给obj.style.left
                obj.style.left=nextX+'px'
            }
        },10)
    }
①由于鼠标移入轮播图的时候前,轮播图中的左右箭头是隐藏的,当鼠标移入时显示;因此需要为装轮播图的大盒子(.carousel)绑定鼠标移入(onmouseover)和鼠标移出事件(onmouseout)
oCarousel.onmouseover = function () {
        oChevron.style.display = "block"
    }

    oCarousel.onmouseout = function () {
        oChevron.style.display = "none"
    }
②为左右按钮绑定点击事件,定义一个计数器全局变量n,代表轮播图中图片的位置,因为这里一个li的大小为500px,所以设置一个全局变量步长step为500(步长作为每次移动轮播图中ul的距离)
let n = 0
let step = 500
    oLeft.onclick = function () {
        n--

        if (n == -1) {
       //当移到第一张(n=0),再次点击时(n=-1),将n设置为4,跳转到最后一张图片的位置
       //装轮播图图片的ul的位置改为最后一张图片的位置(因为一张图片width为500px,所以最后一张在5*500=2500的位置)
            oUl.style.left = -2500 + 'px'
            n = 4
        }
        //target为移动距离,即:第n张图片 * 每张图片的width
        let target = -n * step
        animation(oUl, target)

    }
    oRight.onclick = function () {
        n++
        if (n == 6) {
        //当移到第最后一张(n=5),再次点击时(n=6),将n设置为1,跳转到第一张图片的位置
            oUl.style.left = 0 + 'px'
            n = 1
        }
        let target = -n * step
        animation(oUl, target)

    }
3、通过点击下面的数字来实现轮播图切换
//因为上面通过document.querySelectorAll('.indicators li') 获取到的li是通过伪数组的形式返回的,使用需要遍历该伪数组为每个li绑定点击事件
for (let i = 0; i < oActives.length; i++) {
        oActives[i].onclick = function () {
            //为被点击的第i个设置样式为高亮
            setActive(i)
            //并且把i的值赋值给n(相当于记录当前应该显示第i张图片)
            n = i
            //设置移动的距离
            let target = -n * step
            animation(oUl, target)
        }
    }

    // 封装一个函数,实现li的高亮
    function setActive(ind) {
        //使用排他思想:清除全部,然后在单独设置类名
        for (let j = 0; j < oActives.length; j++) {
            oActives[j].className = ''
        }
        oActives[ind].className = 'active'
    }
修改第2步中点击左右箭头滑动轮播图下面页面高亮不变的情况
oLeft.onclick = function () {
        n--
        if (n == -1) {
            oUl.style.left = -2500 + 'px'
            n = 4
        }
        //调用setActive()函数,修改第n张图片页码的高亮状态
        setActive(n)
        let target = -n * step
        animation(oUl, target)

    }
    oRight.onclick = function () {
        n++
        if (n == 6) {
            oUl.style.left = 0 + 'px'
            n = 1
        }
        //如果n为5时,表示已经到了第6张图片(而第六张图片是和第1张一样的,只是用来滑动过渡,防止瞬间跳转的效果)所以需要设置页码为0(即第一张图片)的高亮状态
        //这里使用了三元表达式,如果n为5,则设置第1张图片为高亮,否则设置第n张为高亮
        n == 5 ? setActive(0) : setActive(n)
        let target = -n * step
        animation(oUl, target)

    }
4、设置定时器,在移入轮播图时清除定时器,移出时开启定时器(实现移入时停止自动播放,移出时开启自动播放)
//在加载页面时应该先开启定时器,否则轮播图不能自动播放,需要等待一次移入且移出事件才会开启定时器
timer = setInterval(function () {
            //调用右侧按钮绑定的点击事件
            oRight.onclick()
        }, 2000)

    //鼠标移入时,显示左右箭头,并且清除定时器
    oCarousel.onmouseover = function () {
        oChevron.style.display = "block"
        clearInterval(timer)
    }

    //鼠标移出时,隐藏左右箭头,并且开启定时器
    oCarousel.onmouseout = function () {
        oChevron.style.display = "none"
        timer = setInterval(function () {
            oRight.onclick()
        }, 2000)
    }
完整代码如下:
CSS样式如下:
* {
     margin: 0;
     padding: 0;
        }

        .carousel {
            width: 500px;
            height: 200px;
            border: 1px solid red;
            margin: 100px auto;
            position: relative;
            overflow: hidden;
        }
        .carousel li {
            list-style: none;
        }

        /* 轮播内容 */
        .carousel-body {
            width: 3000px;
            height: 200px;
            position: absolute;
        }
        .carousel-body li {
            list-style: none;
            float: left;
            width: 500px;
            height: 200px;
        }

        .carousel-body li img {
            width: 100%;
            height: 100%;
        }


        /* 左右焦点按钮 */
        .carousel .chevron {
            position: absolute;
            top: 50%;
            height: 40px;
            width: 100%;
            transform: translateY(-50%);
            display: none;
        }

        .carousel .chevron-left,
        .carousel .chevron-right {
            width: 40px;
            height: 40px;
            background: #000;
            cursor: pointer;
            text-align: center;
            line-height: 40px;
            font-size: 30px;
            font-weight: bold;
            color: #fff;
            opacity: .3;
            border: 1px solid #fff;
        }


        .carousel .chevron-left {
            float: left;
            margin-left: 10px;
        }


        .carousel .chevron-right {
            float: right;
            margin-right: 10px;
        }


        /* 5.2 轮播指示器结构 */
        .carousel .indicators {
            position: absolute;
            right: 30px;
            bottom: 20px;
        }

        .carousel .indicators li {
            float: left;
            width: 20px;
            height: 20px;
            margin-right: 10px;
            background: rgba(255, 255, 255, .8);
            text-align: center;
            line-height: 20px;
            cursor: pointer;
            color: rgba(0, 0, 0, .5);
        }

        .carousel .indicators li.active {
            background: #09f;
            color: red;
 }
HTML如下:
<div class="carousel">
<!-- 轮播内容 -->
<ul class="carousel-body">
<li><a href="#" rel="external nofollow" rel="external nofollow" rel="external nofollow" rel="external nofollow" rel="external nofollow" rel="external nofollow" rel="external nofollow" ><img src="./images/1.jpg" alt=""></a></li>
<li><a href="#" rel="external nofollow" rel="external nofollow" rel="external nofollow" rel="external nofollow" rel="external nofollow" rel="external nofollow" rel="external nofollow" ><img src="./images/2.jpg" alt=""></a></li>
<li><a href="#" rel="external nofollow" rel="external nofollow" rel="external nofollow" rel="external nofollow" rel="external nofollow" rel="external nofollow" rel="external nofollow" ><img src="./images/3.jpg" alt=""></a></li>
<li><a href="#" rel="external nofollow" rel="external nofollow" rel="external nofollow" rel="external nofollow" rel="external nofollow" rel="external nofollow" rel="external nofollow" ><img src="./images/4.jpg" alt=""></a></li>
<li><a href="#" rel="external nofollow" rel="external nofollow" rel="external nofollow" rel="external nofollow" rel="external nofollow" rel="external nofollow" rel="external nofollow" ><img src="./images/5.jpg" alt=""></a></li>
<li><a href="#" rel="external nofollow" rel="external nofollow" rel="external nofollow" rel="external nofollow" rel="external nofollow" rel="external nofollow" rel="external nofollow" ><img src="./images/1.jpg" alt=""></a></li>
<!-- a3.1 新增1个li与第1张相同 -->
<!-- <li><a href="#" rel="external nofollow" rel="external nofollow" rel="external nofollow" rel="external nofollow" rel="external nofollow" rel="external nofollow" rel="external nofollow" ><img src="./images/1.jpg" alt=""></a></li> -->
</ul>
<!-- 左右焦点按钮 -->
<div class="chevron">
<div class="chevron-left">«</div>
<div class="chevron-right">»</div>
</div>
<!-- 5.1 轮播指示器结构 -->
<ol class="indicators">
<li class="active">1</li>
<li>2</li>
<li>3</li>
<li>4</li>
<li>5</li>
</ol>
</div>
js如下:
let oCarousel = document.querySelector('.carousel')
let oChevron = document.querySelector('.chevron')
let oLeft = document.querySelector('.chevron-left')
let oRight = document.querySelector('.chevron-right')
let oUl = document.querySelector('.carousel-body')
let oActives = document.querySelectorAll('.indicators li')

    let n = 0
    let step = 500
    let timer
    timer = setInterval(function () {
            oRight.onclick()
        }, 2000)
    oCarousel.onmouseover = function () {
        oChevron.style.display = "block"
        clearInterval(timer)
    }

    oCarousel.onmouseout = function () {
        oChevron.style.display = "none"
        timer = setInterval(function () {
            oRight.onclick()
        }, 2000)
    }
    oLeft.onclick = function () {
        n--
        if (n == -1) {
            oUl.style.left = -2500 + 'px'
            n = 4
        }
        setActive(n)
        let target = -n * step
        animation(oUl, target)

    }
    oRight.onclick = function () {
        n++
        if (n == 6) {
            oUl.style.left = 0 + 'px'
            n = 1
        }
        n == 5 ? setActive(0) : setActive(n)
        let target = -n * step
        animation(oUl, target)

    }
    for (let i = 0; i < oActives.length; i++) {
        oActives[i].onclick = function () {
            setActive(i)
            n = i
            let target = -n * step
            animation(oUl, target)
        }
    }

    // 封装一个函数,实现li的高亮
    function setActive(ind) {
        for (let j = 0; j < oActives.length; j++) {
            oActives[j].className = ''
        }
        oActives[ind].className = 'active'
    }

    function animation(obj,target){
        // 清除定时器
        clearInterval(obj.timer)
        obj.timer=setInterval(()=>{
            // 读取元素当前位置
            let curX=obj.offsetLeft

            //定义一个步长
            let step=10
            // 判断将要移动的方向(比较目标位置与当前位置的大小)
            if(target<curX){
                step=-10
            }
            // 根据当前位置与目标位置,以及步长的关系判断
            // 只要目标位置与当前位置之间的距离 < 步长,就直接将元素的位置设置为目标为位置即可
            if(Math.abs(target-curX)<Math.abs(step)){
                obj.style.left=target+'px'
                clearInterval(obj.timer)
            }else{
                // 计算下一步的位置
                let nextX=curX+step
                // 将下一步的位置赋值给obj.style.left
                obj.style.left=nextX+'px'
            }
        },10)
}
以上就是本文的全部内容,希望对大家的学习有所帮助,也希望大家多多支持NICE源码。


