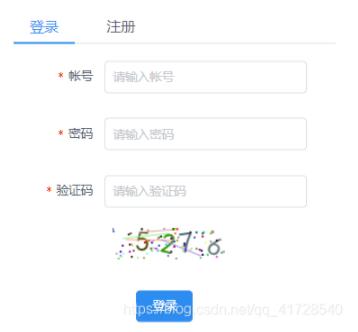
本文实例为大家分享了vue+springboot实现登录功能的具体代码,供大家参考,具体内容如下
1. 登录功能的实现
实现提交表单的代码如下:
async submitForm(user) {
        this.$refs[user].validate((valid) => {
               if(valid){
                        alert("user");
                        this.$axios.post("http:localhost:8087/user/login?code="+this.code,user).then(res => {
                            alert("success")
                             if(res.data.state){
                                 alert(res.data.msg+"登录成功,即将跳转到主页......");
                             }
                             else{
                                 alert(res.data.msg);
                             }
                        });
                    }
                    else{
                        return false;
           }
   });
},
当头一棒,脑瓜嗡嗡的。

这东西嗡嗡了好几天最终被我用比较愚蠢的代码实现了,具体思路如下:
首先我现在后台获取到当前生成验证码图片的真正验证码,传递到前端:
if (valid) {
        console.log(this.user);
         this.$axios.get("http://localhost:8087/user/getCode").then(res => {
                  let tcode = res.data.toLowerCase();
                  if (tcode == this.code) {
                                verify(this.user);
                            } else {
                                alert('验证码错误!');
                            }
                        });
                    }
中间的verify就是我验证用户登录的用户名和密码的地方,验证码首先生成四位验证码然后转化为base64格式的字符串,最后传递到前端,后端返回字符串的代码。
@GetMapping("/getCode")
    @ApiOperation(value="获取验证码",notes="从后端获取验证码发送到前端")
    public String getCode(HttpServletRequest request){
        String key = (String)request.getServletContext().getAttribute("code");
        log.info("key:[{}]",key);
        return key;
    }
我分析登录模块前端给后端传值不成功的原因是因为前端只有用户名和密码,然后我错认为只有用户名和密码的表单可以组成一个对象导致一直将表单强制转化为对象去传递给后端,这样就一直造成了死循环,在这个问题卡了好久好久。之前也是将用户名密码和验证码传递给后端一直卡在那里。我先从后端获取验证码在前端比较正确与否,然后将用户输入的用户名和密码传递给后端在数据库中查找对应用户名的用户,若可以查找得到则说明此用户存在,否则用户存在。接下来比较用户输入的密码是否和数据库存入的密码一致,如果一致则返回真,登录成功,其他情况都不成功。具体的实现代码如下:
//UserController
 @PostMapping("/login")
    @ApiOperation(value = "登录系统", notes = "登录员工管理系统")
    public Map<String,Object> login(@RequestParam String Name,@RequestParam String Pwd){
        System.out.println(Name+" "+Pwd);
        Map<String,Object> map = new HashMap<>();
        try{
            User userdb = userService.login(Name,Pwd);
            map.put("state",true);
            map.put("msg","登录成功");
            map.put("user",userdb);
        }catch(Exception e){
            e.printStackTrace();
            map.put("state",false);
            map.put("msg",e.getMessage());
        }
        log.info("[{}]",map.toString());
        return map;
    }
//UserServiceImpl
 @Override
    public User login(String Name,String Pwd) {
        User userDB = userMapper.selectByName(Name);
        if(!ObjectUtils.isEmpty(userDB)){
            if(userDB.getPwd().equals(Pwd)){
                return userDB;
            }
            else{
                throw new RuntimeException("密码输入不正确");
            }
        }
        else{
            throw new RuntimeException("用户不存在");
        }
    }
//UserMapper.java
User selectByName(String name);
<!--UserMapper.xml-->
 <select id="selectByName" parameterType="String" resultType="com.sunset.system.entity.User">
        select Id,Name,Age,Sex,Pwd,Dept,Salary
        from user where Name = #{name}
</select>
在编码过程中,还遇到一个小插曲 就是 where Name = “#{name}” 导致在数据库查找中出错,希望看此文章的人能避开这个坑。
这样后端的逻辑就实现完成,下来是前端逻辑:
async function verify(userinfo) {
      const {data: res} = await verifyUser(userinfo);
      console.log(res);
          if (res.state == true) {
               _this.$message({
                 title: "验证成功",
                 message: "欢迎进入员工管理系统",
                  type: "success"
            });
      window.location.href = "http://www.baidu.com";
      //await _this.$router.push("http://www.baidu.com");
       } else {
           _this.$message({
            title: "验证失败",
         message: res.msg,
          type: "error"
       })
       return false;
     }
}
这里使用axios的post请求,具体的路径在projectName.src.api 新建一个user.js的文件
export  const verifyUser = (user) =>{
    return request({
        url: "/user/login",
        method: 'post',
        params: {
            Name: user.Name,
            Pwd: user.Pwd
        }
    })
}
此外还需要配置request.js,文件路径 projectName.src.utils
import axios from 'axios'

const instance = axios.create({
  baseURL: 'http://localhost:8080', //后端项目的端口
  timeout: 10000,
  headers: {'X-Custom-Header': 'foobar'}
});

export default instance;
要是有其他逻辑问题,欢迎讨论交流。
以上就是本文的全部内容,希望对大家的学习有所帮助,也希望大家多多支持NICE源码。


