目录
- 首先我们需要搭建好页面布局
- JS功能1
- JS功能2
- JS功能3
- JS功能4
效果图如下:
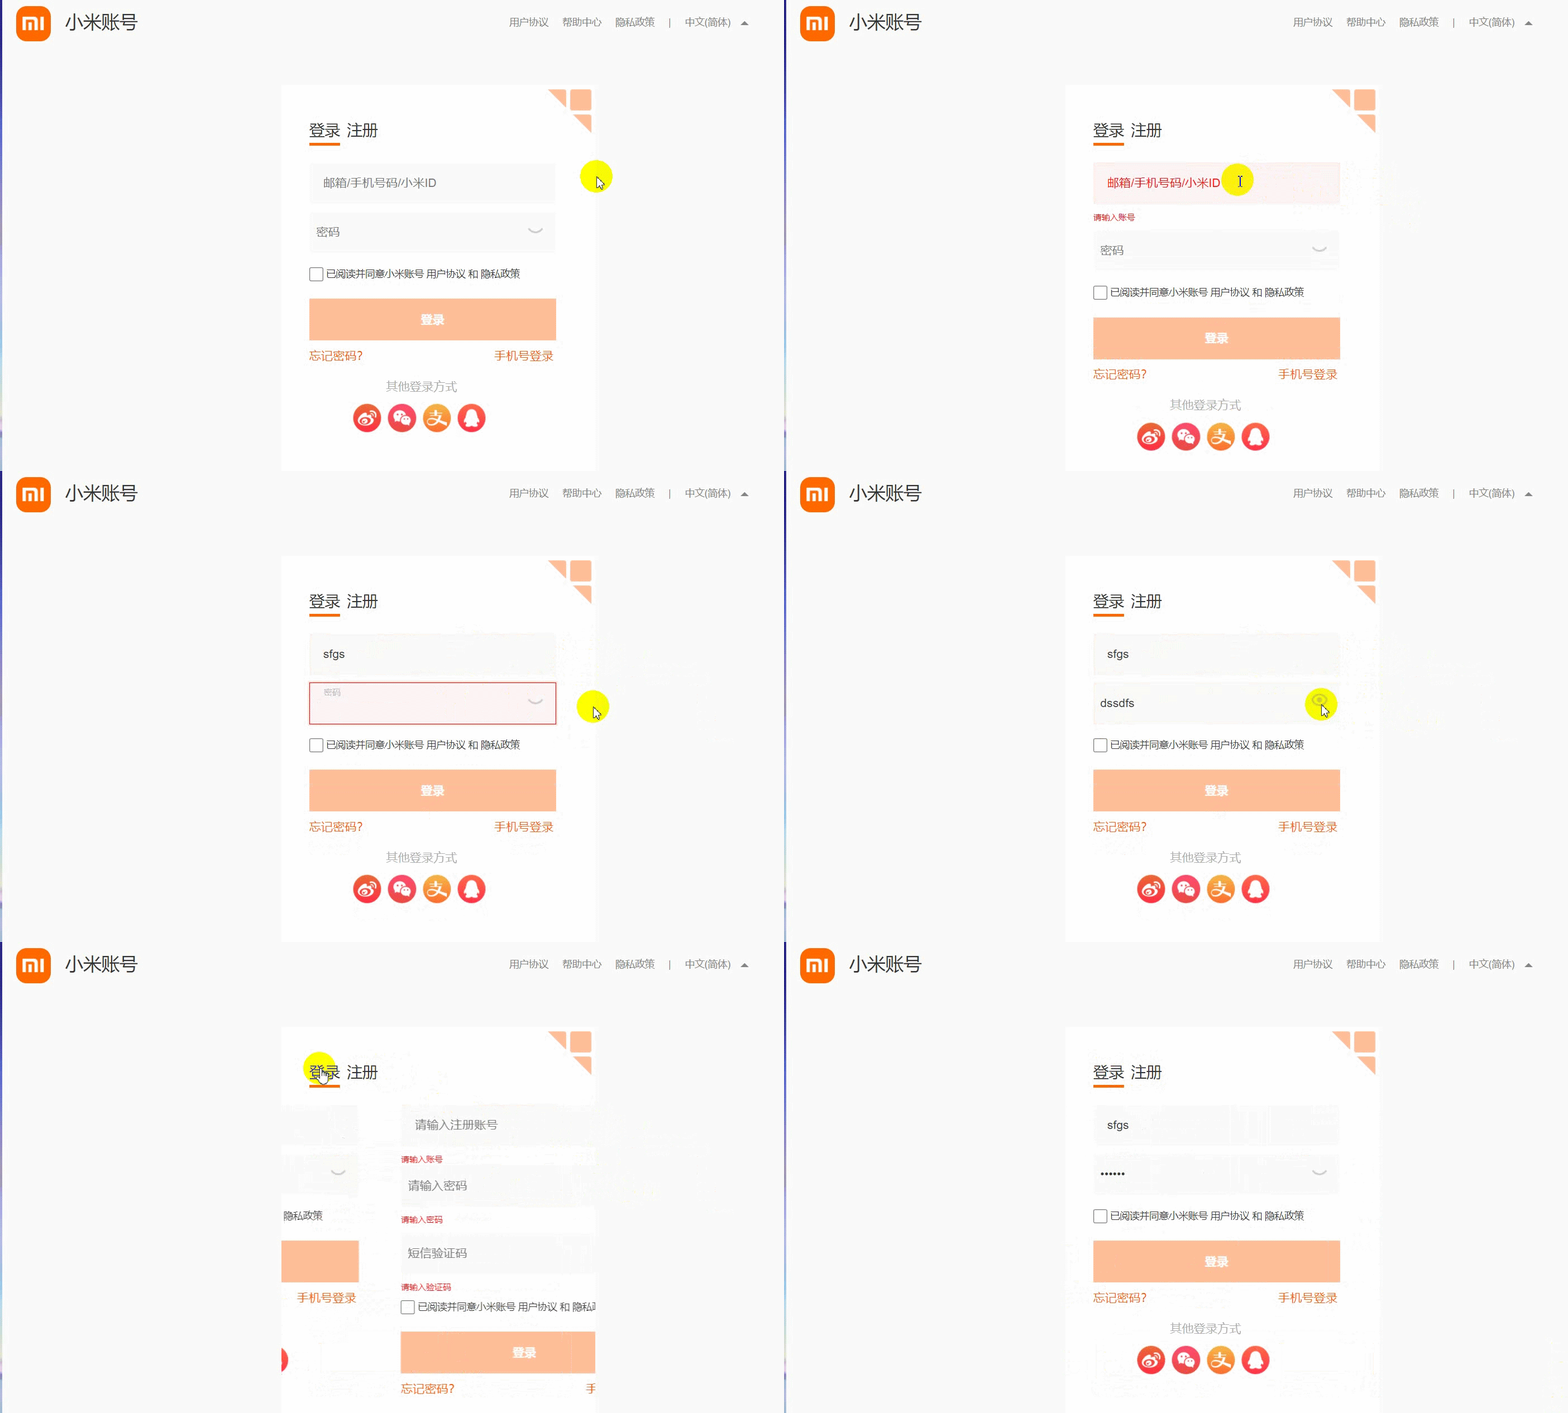
首先我们需要搭建好页面布局
html的代码如下:
<div class="contentrightbottom">
<div class="contentrightbottombox">
<div class="crbottomlogin">
<div class="login"><a href="#" rel="external nofollow" rel="external nofollow" rel="external nofollow" rel="external nofollow" rel="external nofollow" rel="external nofollow" rel="external nofollow" rel="external nofollow" rel="external nofollow" rel="external nofollow" rel="external nofollow" rel="external nofollow" >登录</a></div>
<div class="regist"><a href="#" rel="external nofollow" rel="external nofollow" rel="external nofollow" rel="external nofollow" rel="external nofollow" rel="external nofollow" rel="external nofollow" rel="external nofollow" rel="external nofollow" rel="external nofollow" rel="external nofollow" rel="external nofollow" >注册</a></div>
</div>
<div class="loginregistbox">
<ul>
<li>
<div class="crbottomcontent">
<input type="text" placeholder="邮箱/手机号码/小米ID" class="user">
<br>
<p class="pzh">请输入账号</p>
<div class="pwdeyebox">
<input type="password" placeholder="密码" class="pwd"><br>
<img src="close.png" alt="" class="eye">
</div>
<p class="pmm">请输入密码</p>
<input type="checkbox" class="checks">
<span>已阅读并同意小米账号</span>
<span>用户协议</span>
<span>和</span>
<span>隐私政策</span><br>
<button>登录</button><br>
<span class="forgetpwd"><a href="#" rel="external nofollow" rel="external nofollow" rel="external nofollow" rel="external nofollow" rel="external nofollow" rel="external nofollow" rel="external nofollow" rel="external nofollow" rel="external nofollow" rel="external nofollow" rel="external nofollow" rel="external nofollow" >忘记密码?</a></span>
<span class=" phonelogin"><a href="#" rel="external nofollow" rel="external nofollow" rel="external nofollow" rel="external nofollow" rel="external nofollow" rel="external nofollow" rel="external nofollow" rel="external nofollow" rel="external nofollow" rel="external nofollow" rel="external nofollow" rel="external nofollow" >手机号登录</a></span>
<p class="other">其他登录方式</p>
<div class="crbottomcontentimg">
<span><img src="share1.png" alt=""></span>
<span><img src="share2.png" alt=""></span>
<span><img src="share3.png" alt=""></span>
<span><img src="share4.png" alt=""></span>
</div>
</div>
</li>
<li>
<div class="crbottomcontentregist">
<input type="text" placeholder="请输入注册账号" class="ruser">
<p class="rpzh">请输入账号</p>
<br>
<input type="password" placeholder="请输入密码" class="rpwd">
<p class="rpmm">请输入密码</p><br>
<input type="number" class="rphone" placeholder="短信验证码">
<p class="rpyzm">请输入验证码</p><br>
<input type="checkbox" class="checks">
<span>已阅读并同意小米账号</span>
<span>用户协议</span>
<span>和</span>
<span>隐私政策</span><br>
<button>登录</button><br>
<span class="forgetpwd"><a href="#" rel="external nofollow" rel="external nofollow" rel="external nofollow" rel="external nofollow" rel="external nofollow" rel="external nofollow" rel="external nofollow" rel="external nofollow" rel="external nofollow" rel="external nofollow" rel="external nofollow" rel="external nofollow" >忘记密码?</a></span>
<span class=" phonelogin"><a href="#" rel="external nofollow" rel="external nofollow" rel="external nofollow" rel="external nofollow" rel="external nofollow" rel="external nofollow" rel="external nofollow" rel="external nofollow" rel="external nofollow" rel="external nofollow" rel="external nofollow" rel="external nofollow" >手机号登录</a></span>
<p class="other">其他登录方式</p>
<div class="crbottomcontentimg">
<span><img src="share1.png" alt=""></span>
<span><img src="share2.png" alt=""></span>
<span><img src="share3.png" alt=""></span>
<span><img src="share4.png" alt=""></span>
</div>
</div>
</li>
</ul>
</div>
</div>
<p class="conpany">小米公司版权所有-京ICP备10046444-京公网安备11010802020134号</p>
</div>
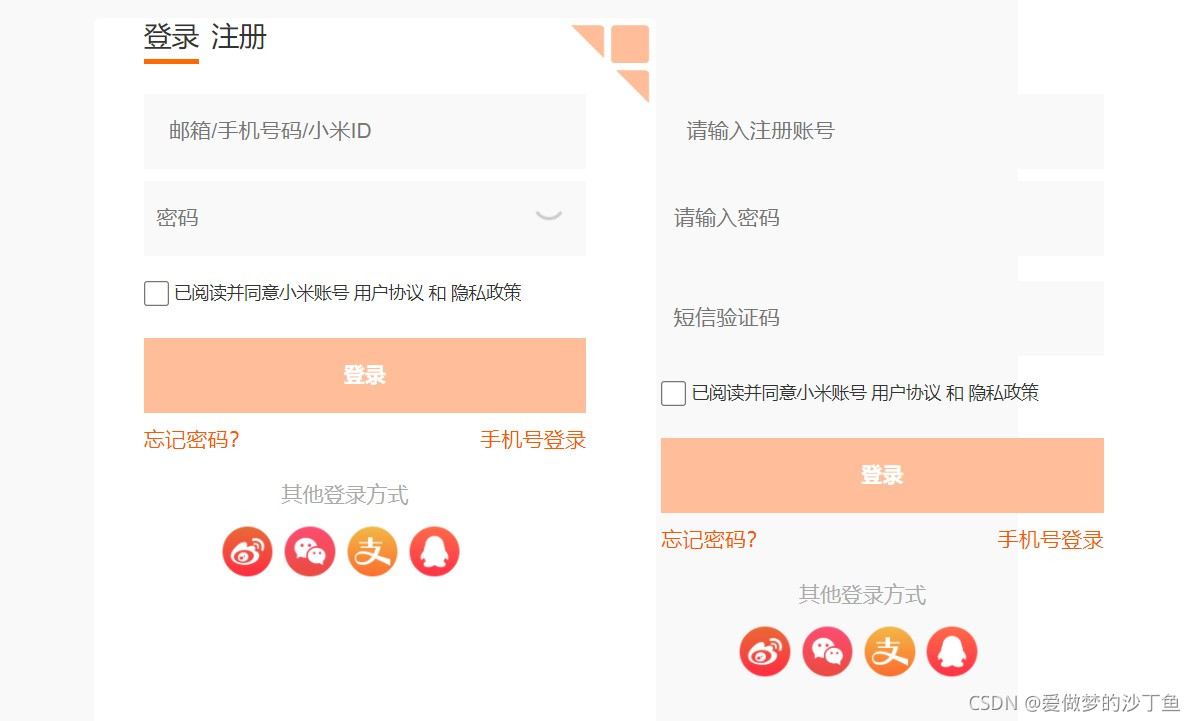
整个登录注册分为上下两个盒子:
上面的盒子装登录和注册两个文字盒子,作为JS的点击滑动按钮
下面的盒子使用小li分别装登录和注册两个盒子,然后让小li浮动起来,让登录注册两个盒子浮动在一行,然后给contentrightbottombox这个大盒子添加overfl:hidden属性,超出的隐藏起来之后我们就可以写JS功能代码了
JS功能1
点击登录注册进行切换
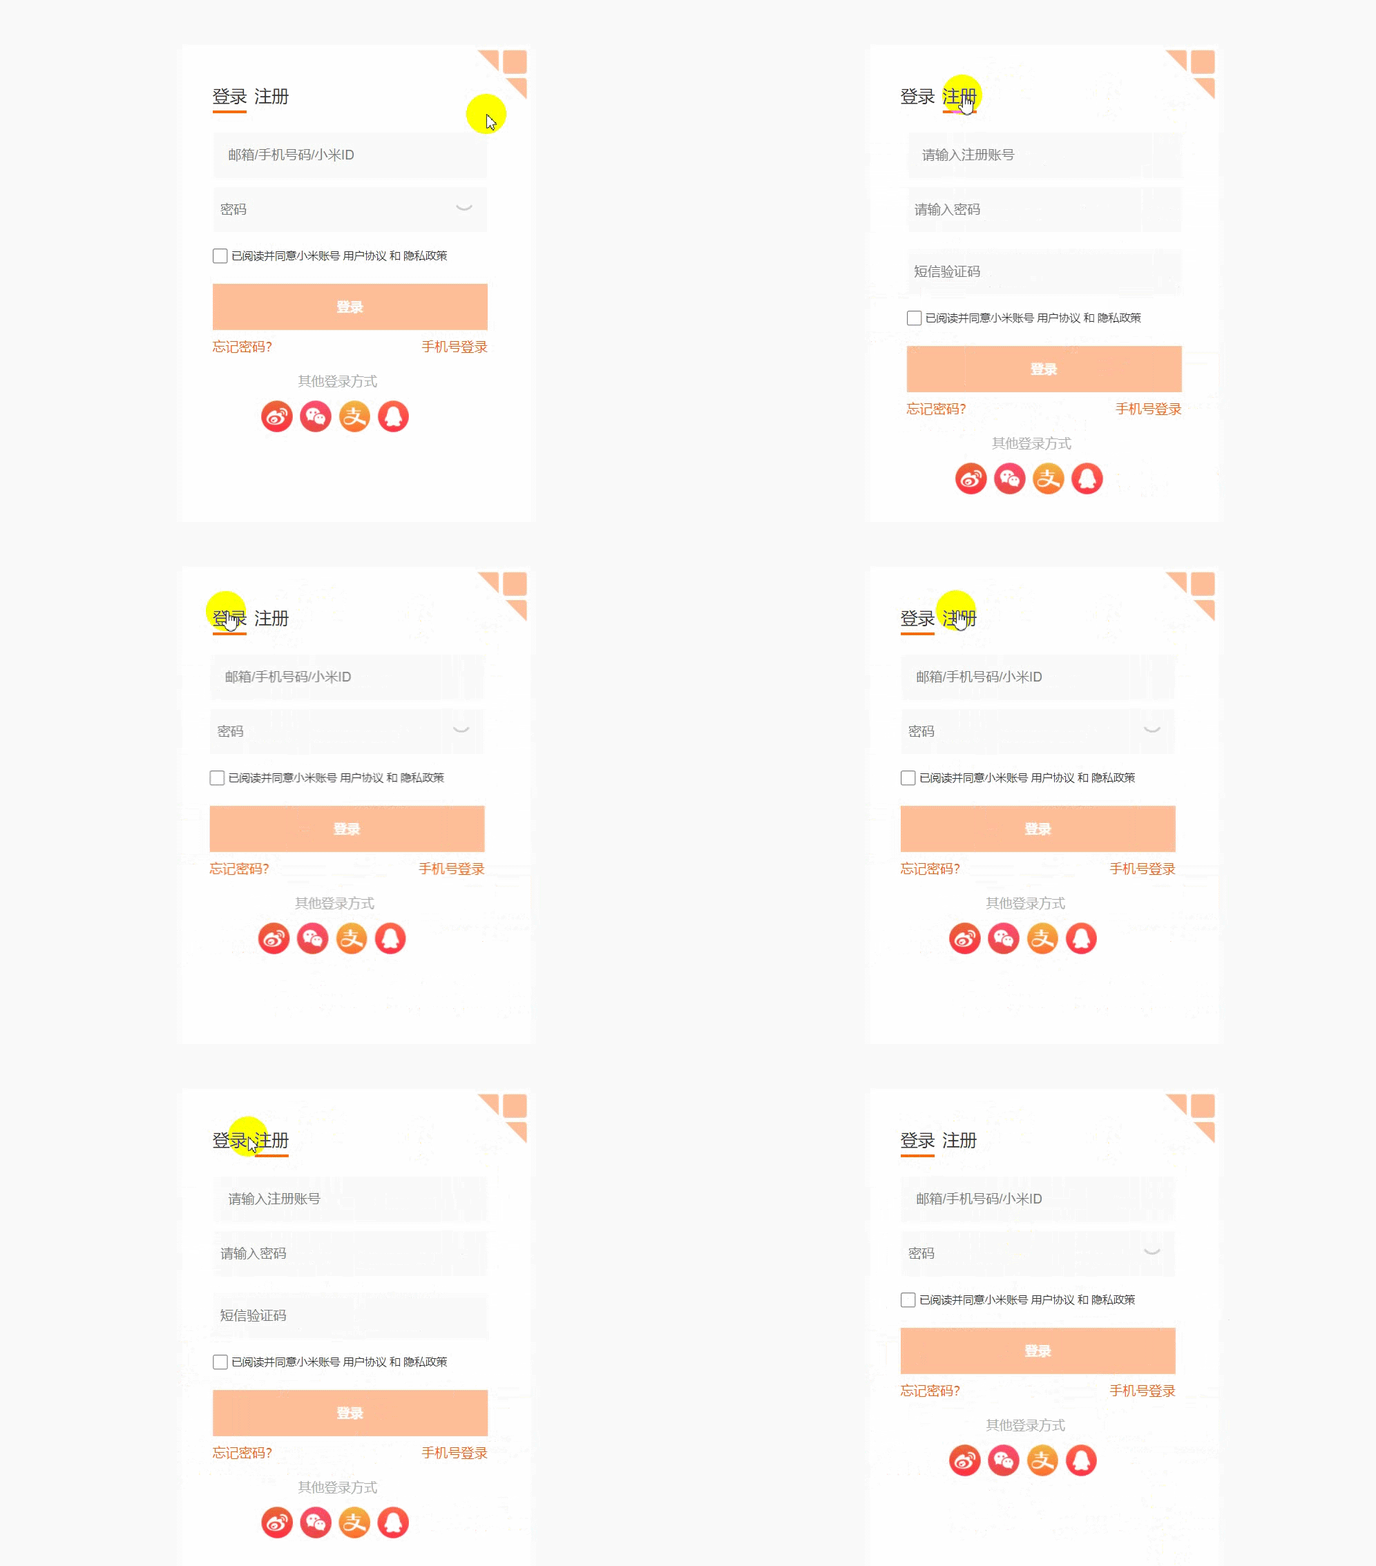
在css里面我们通过小li的浮动将登录和注册的盒子浮动在一排
当我们点击注册按钮的时候只需要让包裹小li的ul移动到注册盒子上面即可
当我们点击登录按钮的时候也只需要让ul移动到登录的盒子上面
代码如下:
  var registbtn = document.querySelector('.regist');
    var loginbtn = document.querySelector('.login');
    var loginregistbox = document.querySelector('.loginregistbox');
    var boxul = loginregistbox.querySelector('ul');

    registbtn.addEventListener('click', function () {
        boxul.style.transition = 'all 0.3s';
        boxul.style.transform = 'translateX(-414px)';
        registbtn.style.borderBottom = '4px solid #FF6900';
        loginbtn.style.borderBottom = 'none';

    });
    loginbtn.addEventListener('click', function () {
        boxul.style.transition = 'all 0.3s';
        boxul.style.transform = 'translateX(0px)';
        loginbtn.style.borderBottom = '4px solid #FF6900';
        registbtn.style.borderBottom = 'none';

    });
JS功能2
点击input盒子里面的文字缩小并往上移动
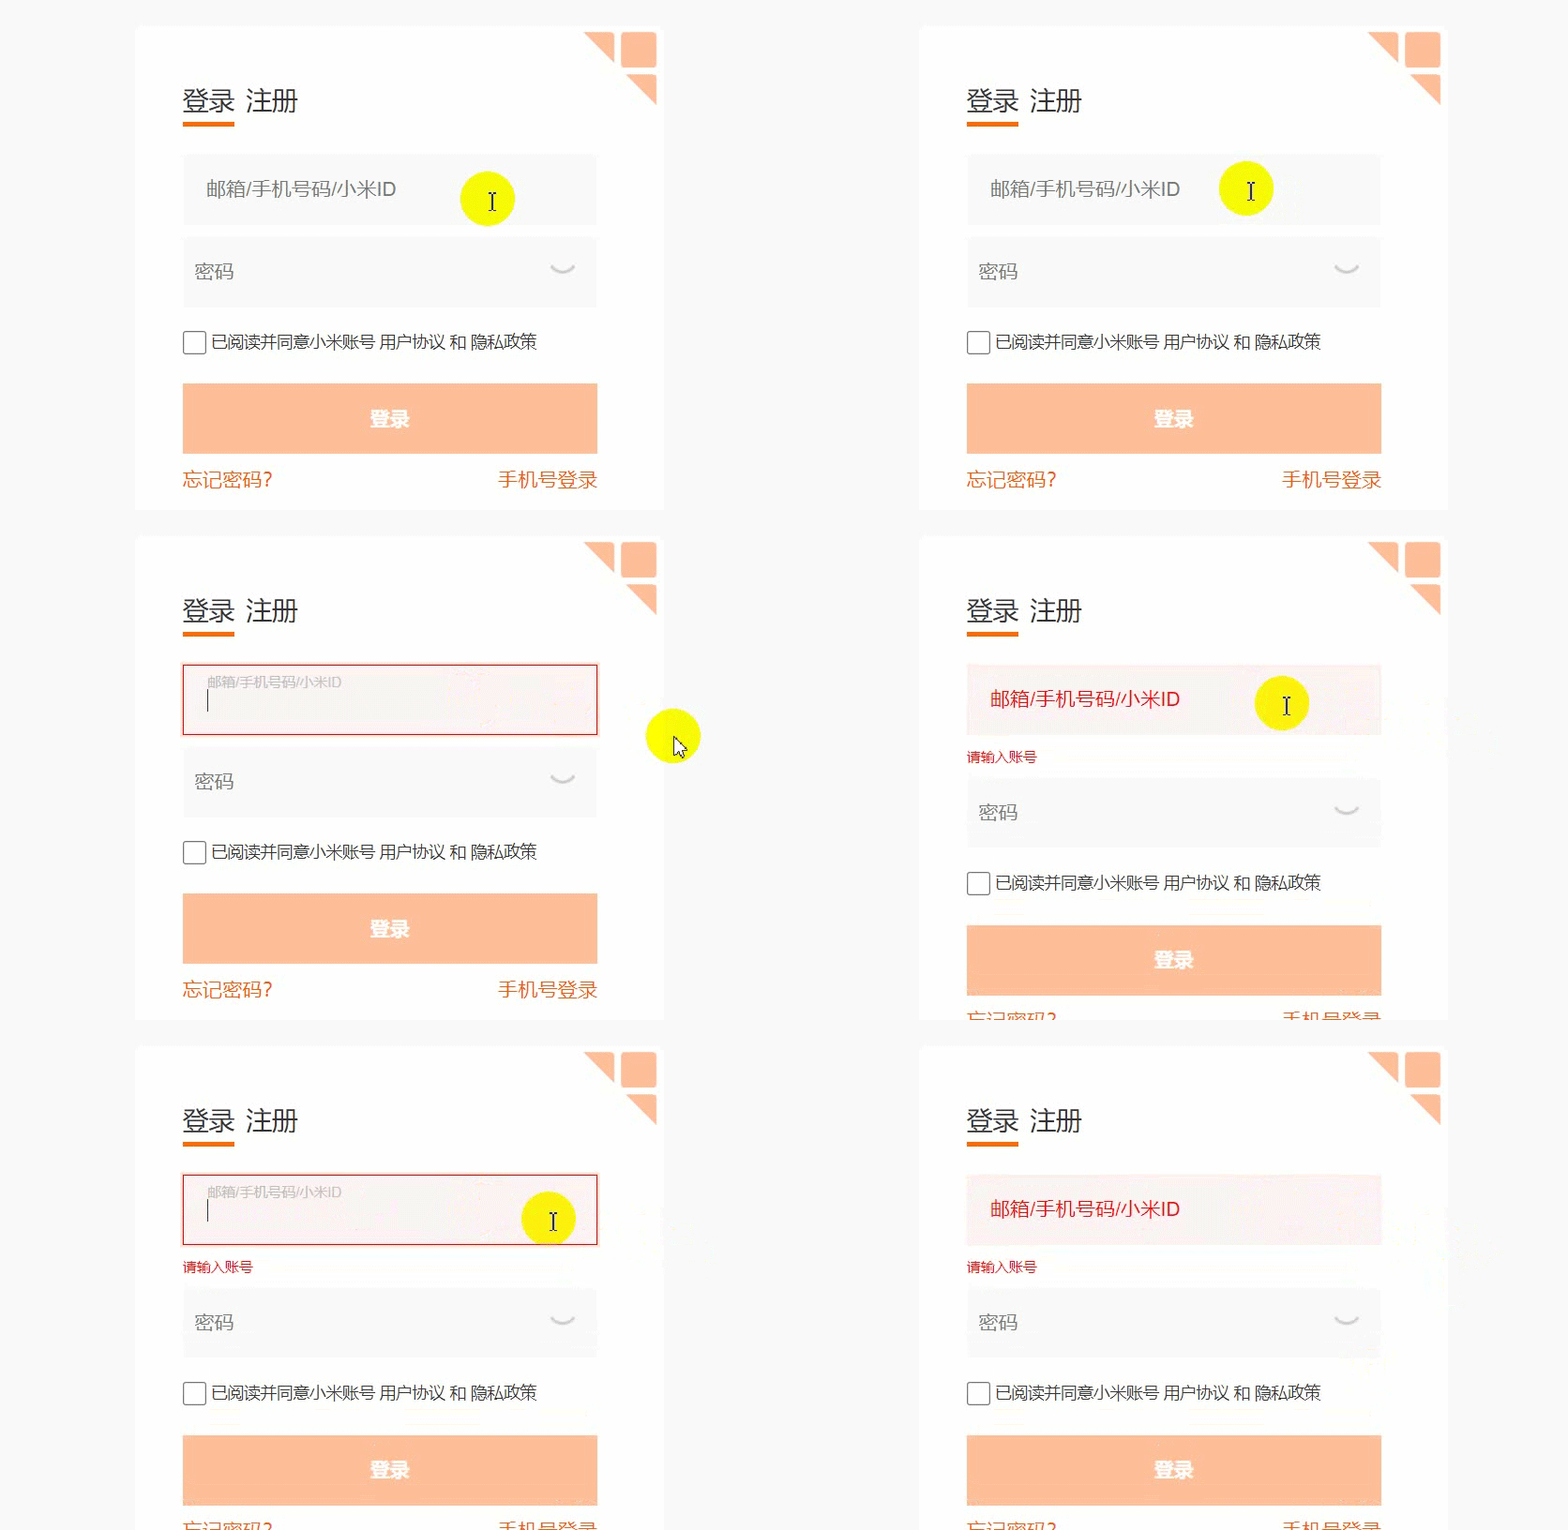
在小米官网的登录里面,它是使用lable标签来实现,我是直接给input里面的placeholder添加样式来实现
修改placeholder的样式我们是通过伪类的方式实现,并且给它定位让它缩小后移动到要求的位置,并且加上了过渡,看起来好看一点点
代码如下:
    var user = document.querySelector('.user');
    var pwd = document.querySelector('.pwd');
    var pzh = document.querySelector('.pzh');
    var pmm = document.querySelector('.pmm');

    user.addEventListener('focus', function () {
        user.style.border = '1px solid red';
        user.style.boxShadow = '0 0 1px 2px #FFDECC';
        user.style.backgroundColor = '#FCF2F3';
        user.style.transition = 'all 0.3s';
        user.setAttribute('class', 'user change1');

    });
.change1::placeholder{
 position: absolute;
 top: 5px;
 left: 20px;
 font-size: 12px;
color: #C1C1C1;
transition: all .3s;

}
.change2::placeholder{
   font-size: 17px;
       color: red;
       transition: all .3s;
   }
JS功能3
跳出提示”请输入账号”
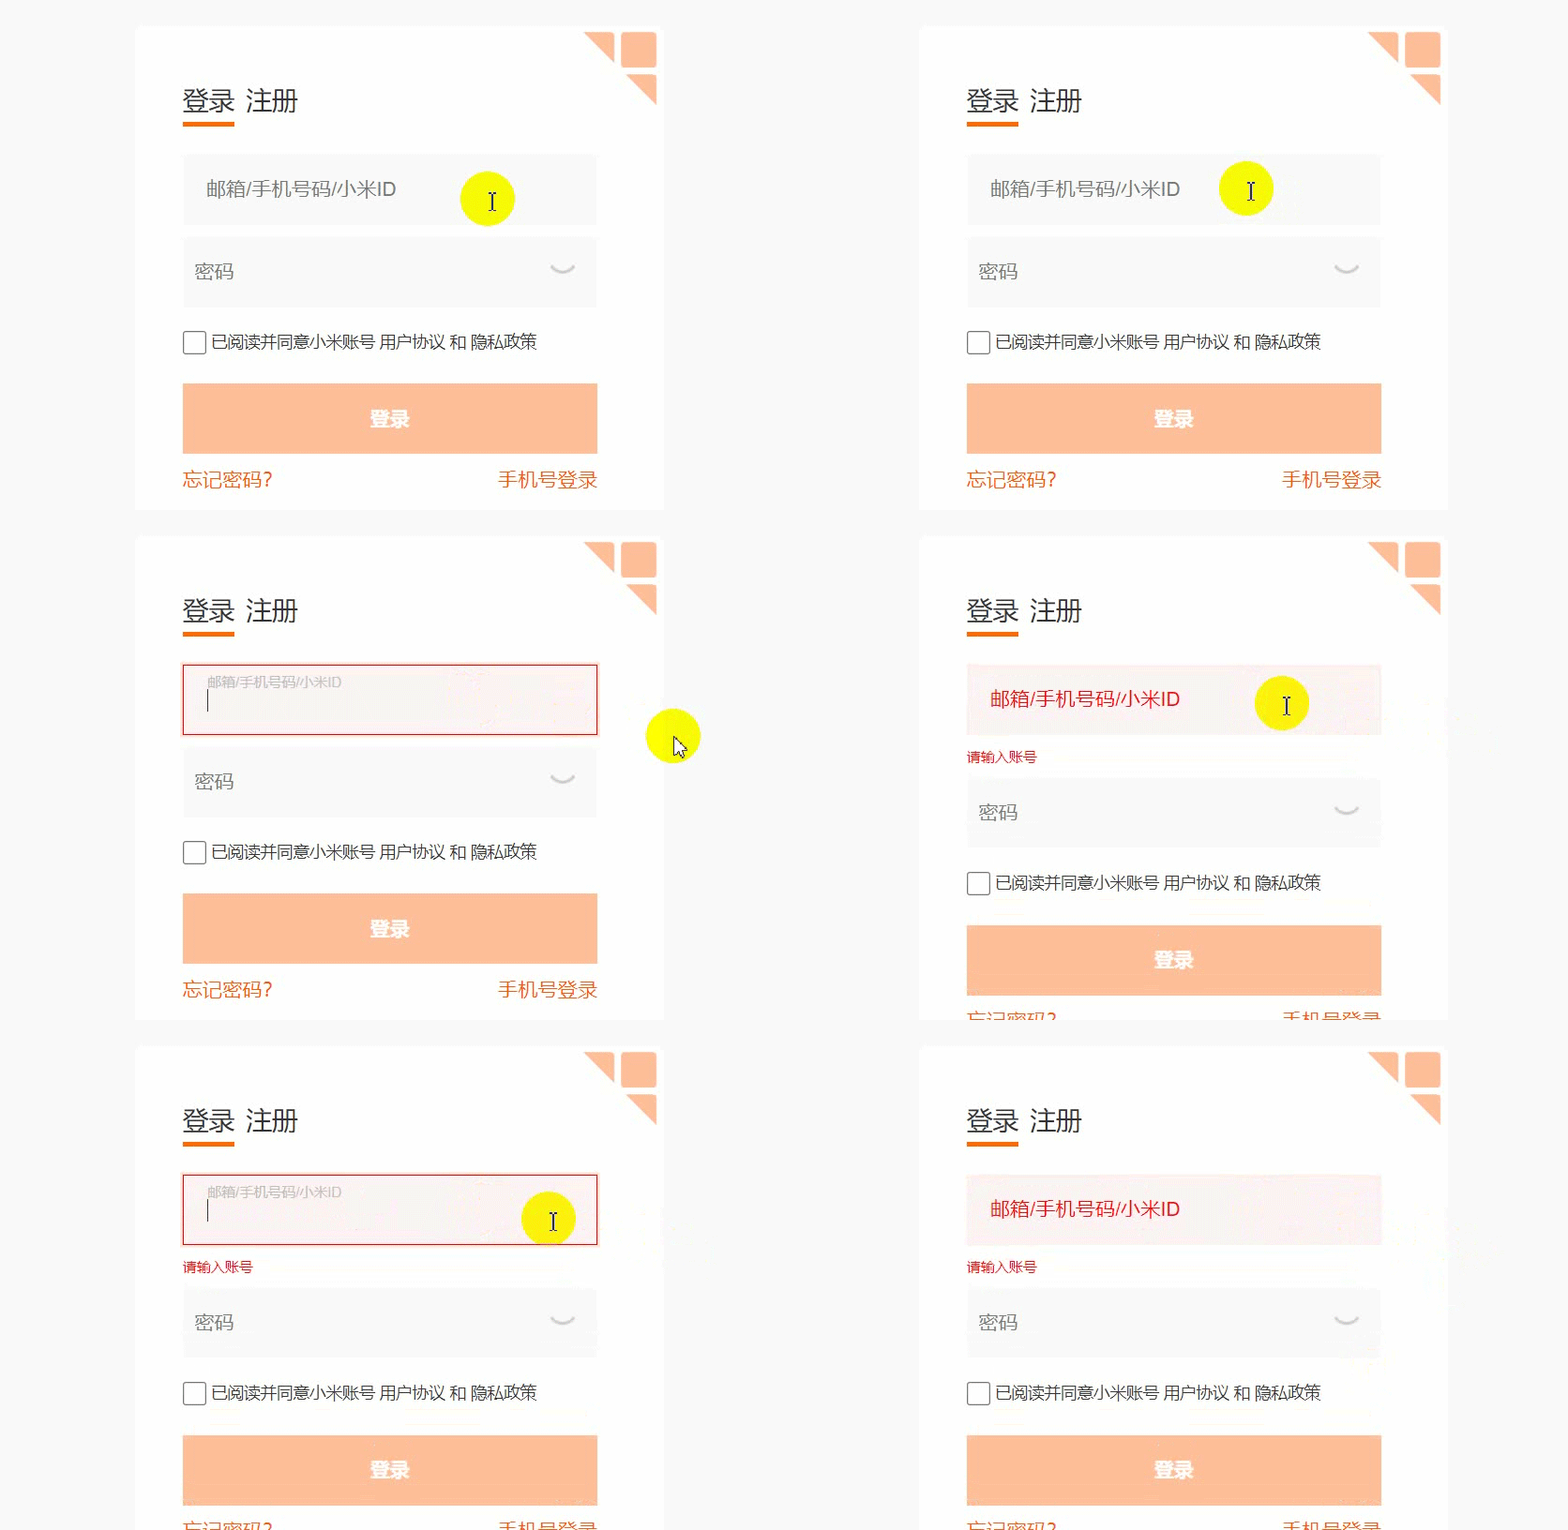
在html添加一个p标签(其他标签也可以),在css里面修改他的样式并给它display样式让他隐藏起来
在js里面 失去焦点的时候判断文本框里面是否有值,有值就让他隐藏,否则就显示
代码如下:
user.addEventListener('blur', function () {

        user.style.border = 'none';
        user.style.boxShadow = 'none';
        user.style.transition = 'all .3s';
        if (user.value == '') {
            pzh.style.display = 'block';
            user.style.backgroundColor = '#FCF2F3';
            user.setAttribute('class', 'user change2');
        } else {
            pzh.style.display = 'none';
            user.style.backgroundColor = '#F9F9F9';
            user.style.fontSize = '17px';

            user.setAttribute('class', 'user change1');
        }
    });
.rpzh,.rpmm,.rpyzm{
    display: none;
    color: red;
    font-size: 12px;
    margin-top: 10px;
    margin-left: 40px;
    margin-bottom: -30px;
}
JS功能4
显示密码和隐藏密码
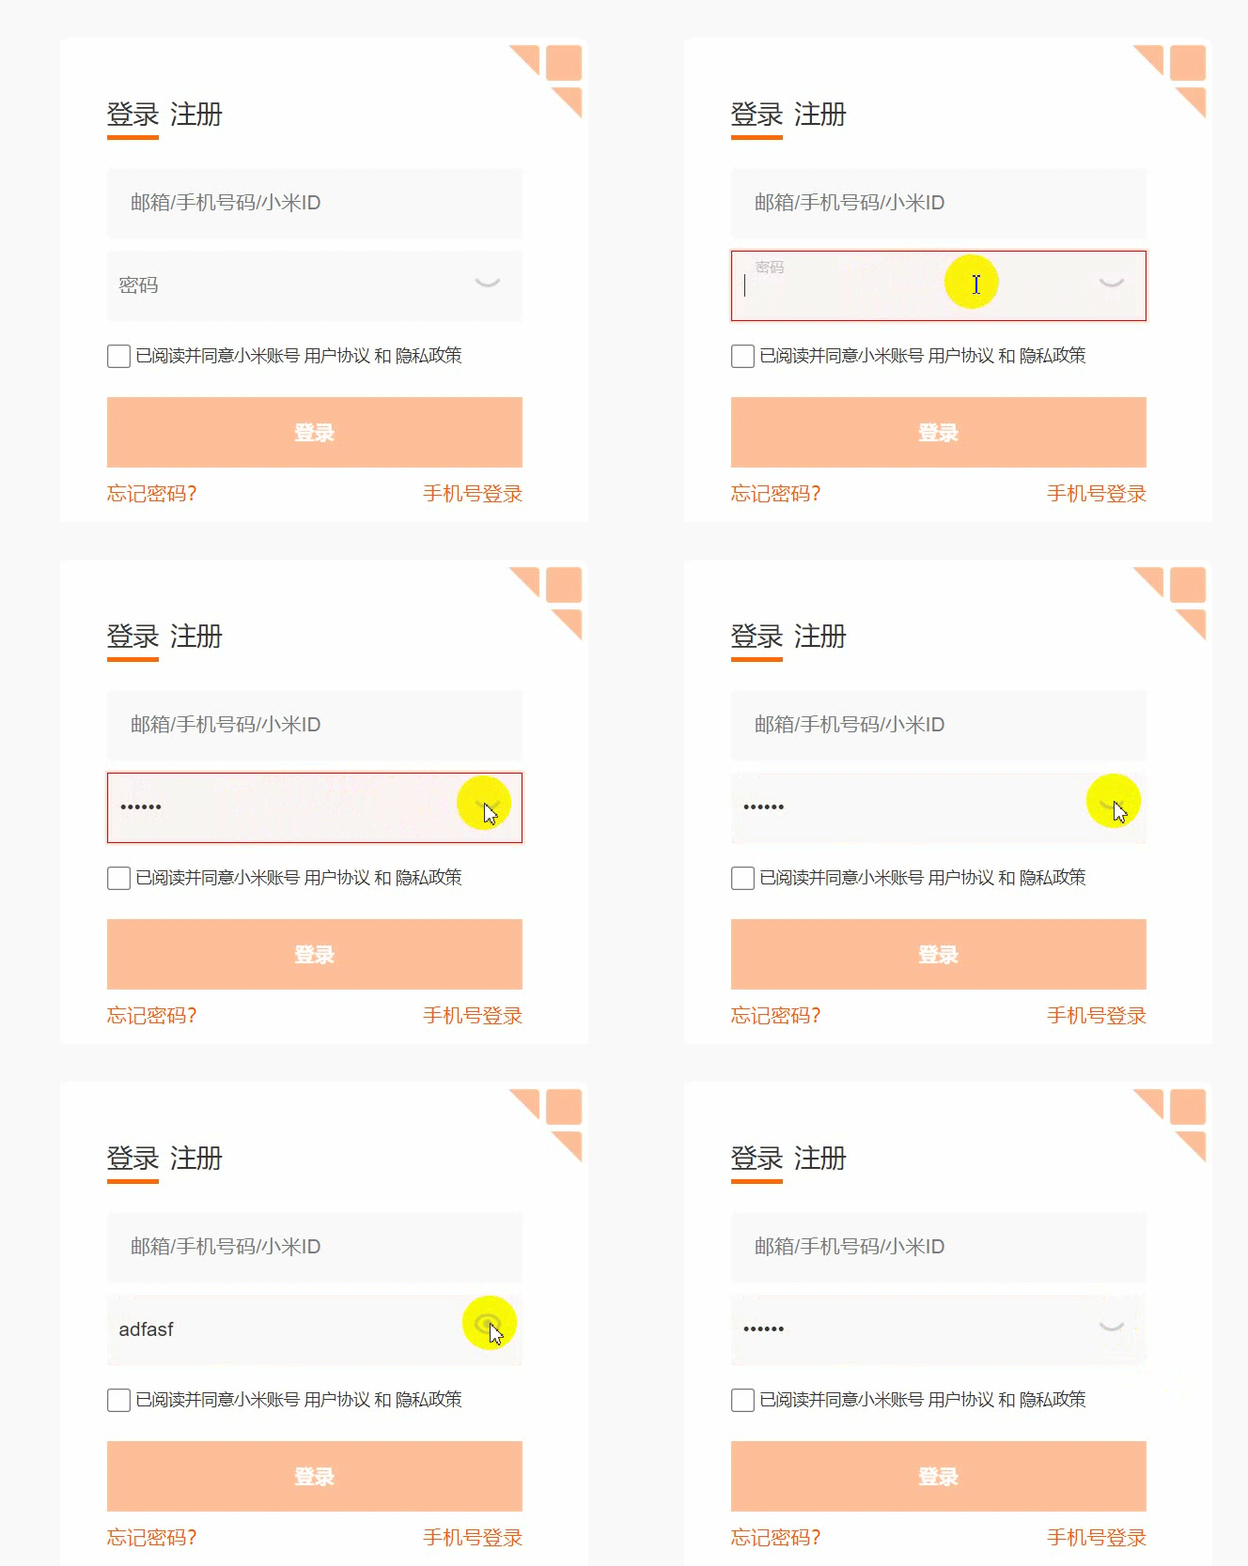
定义一个flag变量来控制开关图片的切换和input中的type属性中的值
  var flag = 0;
    eyes.addEventListener('click', function () {
        if (flag == 0) {
            pwd.type = 'text';
            eyes.src = 'open.png';
            flag = 1;
        }
        else {
            pwd.type = 'password';
            eyes.src = 'close.png';
            flag = 0;
        }
    });
到此这篇关于JavaScript仿小米官网注册登录功能的实现的文章就介绍到这了,更多相关JavaScript 的内容请搜索NICE源码以前的文章或继续浏览下面的相关文章希望大家以后多多支持NICE源码!


